Set up E-Mail temperature alert
After you have made the most important settings (language / time zone / network / user rights) in your IT monitoring unit with the support of the built-in setup assistant, please proceed as follows to setup the e-mail notification.
01. Set up Google Gmail account
As an example we use Google Gmail. If you do not have an Google account yet, please sign in.
Important note: Under the Google "Account Settings" => "Security" =>”Basic settings” please turn on the setting "Less secure app access panel" to "On"
02. Setup of the email account settings in the Didactum remote monitor
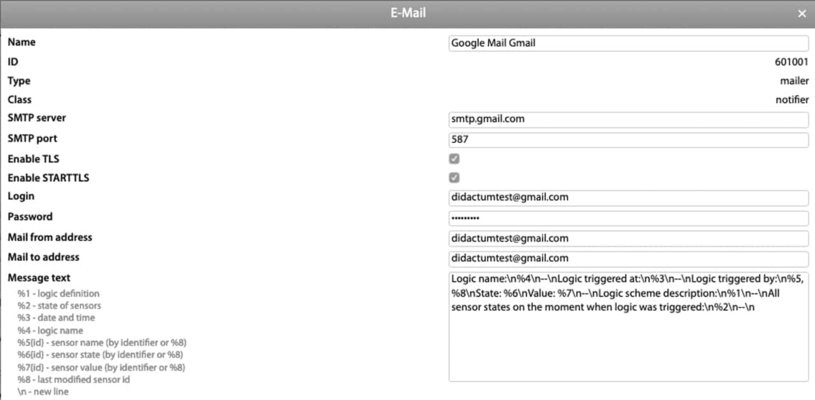
Under menu "System tree" you click on the "+" symbol in the upper left corner. The menu "Add a new element" appears. Please select "E-Mail" and name it individually name. In our example we use "Gmail Gmail" (without quotes).
Then enter the required data under "SMTP Server" and "SNMP Port". We use "smtp.gmail.com" and port "587". The points "TLS" and "STARTTLS" must be activated when using a Gmail account. Under Login and Password you enter your Gmail E-Mail address as well as the password of your account.
Then enter the sender and recipient email. Under "Message Text" we use the factory default Didactum macro function. Alternatively, you can also define your individual text message.
03. Configure your temperature sensor
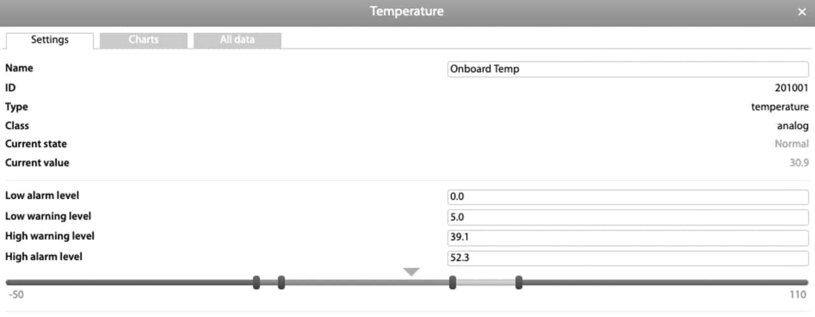
As an example, we select the onboard temperature sensor of our remote measurement & monitoring unit under "System Tree" and configure it according to our individual specifications. Enter the lower, middle and high temperature limits with the keyboard or operate the slider with your mouse.
After the limit and warning values have been set, we give the sensor an individual name, e.g. "Onboard Temp" and save the settings.
04. Set up e-mail alert in the webGUI under "Logic schemes"
Now we proceed with the setup up of the e-mail notification for the temperature sensor. Go to the menu item "Logic schemes" and click on the "+" symbol in the upper left corner. A new window called “Add new logic scheme” will be opened automatically. First, we assign an individual name at the top of the menu, such as "E-Mail notification temperature alert".
To put it simply, the alerting / notification follows the scheme IF => ELEMENT => STATE (NORMAL / WARNING / ALARM) => THEN (ACTION) => ON / OFF. Under "Element" we select the entry "Onboard Temp" and define under "State" the entry "high alarm". Then we determine the required action.
In this example, we use the previously created "Gmail Gmail" item and set the “send mail” action. Then click on "OK" to save your new alarm rule.
The newly created logic called “E-Mail notification temperature alert” is now displayed in the web interface under the entry "Logical schemes".
05. Test your email alert
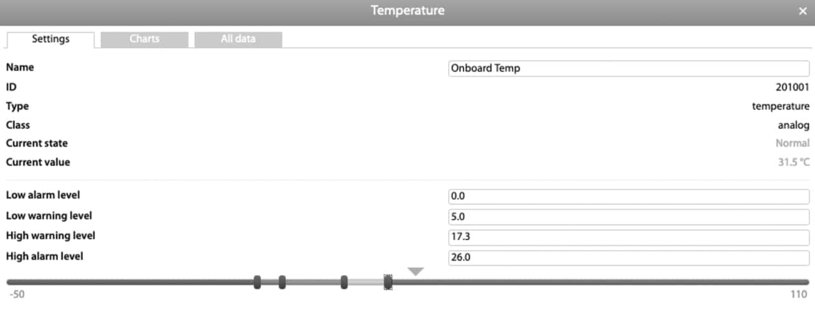
In order to test the previously created eMail temperature alert, we have to set the "Onboard Temp" sensor to the "high alarm" state. To do this, click on the sensor under "System tree" and enter a significantly lower high alarm level. You can also change the temperature warning states individually with your mouse pointer. After you have clicked on "Apply", you now see the entries marked in red in the "System tree". Now go to the menu entry "Overall stats" and you see the message "The mail 'Gmail' was sent" in the top left corner under "Current Log".
Then switch to your Gmail account and check if the email has arrived in the Inbox. Then set the "Onboard Temp Sensor" back to normal.
Editor's Note: After setting up the desired alerts and automatic actions, please click on the floppy disk symbol to save the settings in the non-volatile flash memory of your monitoring unit.


